Annual list of things if announced next week would make me very happy
It’s that time of year again when Apple presents what exciting new features iOS developers are going to be integrating into their apps over the summer.
I’m surprisingly excited about WWDC 2021, and as per tradition here’s my top 5 list of what I’d love to see announced.
1. iPadOS multi-tasking improvements
Once again iPadOS is falling behind, both in parity with iOS14 features, and allowing users take full advantage of the fantastic hardware power of modern iPads.
Other than just catching up e.g. allowing widgets be placed anywhere on the home screens rather than in a single column, we really need a complete redesign of the almost unusable multi-tasking setup.
It’s clear iPadOS needs to be closer to MacOS in offering a better way to run multiple apps at once, run background services, and other “power user” features. Despite the name of this blog, it’s now pretty rare I do any work on my iPad ☹️
Not holding my breath on getting fundamental improvements this year, but surely Apple must be completely rethinking how multi-tasking works? Why else would they break out the iPadOS name other than to make a significant break from iOS?
2. SwiftUI improvements
I really love SwiftUI, both the simplicity of building nice interfaces in code, plus the functional/reactive way it works.
However we really need the platform to become more mature this year. There are so many small but significant pieces missing, that often mean writing UIKit wrappers to achieve what should be built-in features.
Off the top of my head, things that have been painful for me recently include:
Text rendering - in particular using attributed text
Pull to refresh
Navigation - the current use of NavigationLink doesn’t scale at all well for more complex apps
3. More support for Combine
I’ve started using and learning more about Combine recently, and really like it. It obviously works really well in conjunction with SwiftUI, and can simplify many common patterns of app development.
However, it would be great if there were more built-in Publishers for other parts of the system. Casey Liss wrote a great article summarising his thoughts on this topic, and I couldn’t agree more.
With the forthcoming async/await support in Swift 5.5 - and having used this pattern in Flutter recently, I can’t wait for this - it will be interesting to see if Combine is continued to be extended by Apple, or if it becomes semi-abandoned in favour of newer technologies. I really hope not!
4. Interactive widgets
A no brainer this one. Widgets are great, and I use them extensively on both my iPhone and iPad.
Like everyone, I probably “over widgeted” my home screens when they first came out, but now have a good mix of useful widgets amongst my app icons.
However it seems obvious that adding some limited interactivity would make them even more useful. The common example given is play/pause buttons for audio widgets, and I can’t believe they won’t be implementable after this year’s OS updates.
5. Core Data replacement
We really need a replacement for Code Data for the modern age.
So many apps I work on follow a similar pattern - they interact with a server API that returns JSON data, tand we to cache on device for use when the user if offline.
On a recent project we used Realm for the local database storage. It wasn’t too bad compared with past experiences with Core Data, but we still ended up writing too much bolierplate code to manipulate the data from the API response into the correct types to allow it to be easily saved and retrieved offline.
Drew McCormack wrote a great article a few days ago about what he calls “SwiftData” - and I really recommend you reading it if you haven’t already.
I’m not sure about his thoughts on supporting decentralised databases, but having a simple database system that easily maps to say Codable structs, is extensible by default, and “just works” would be fantastic.
TBH I’m not holding out much hope for this, but any improvements to CoreData to match actual usage patterns I see in most apps would be very welcome.
Summary
I’ll update the scorecard after all the details are out of WWDC 2021, but I really hope at least 3/5 come true - and we get some exciting (not AR/VR!) new things to play with that I didn’t realise I needed!
After a year of working on a large Flutter project, plus working on a much smaller React Native project recently, it seems like a good time to update my thoughts on cross-platform development options in 2021.
Flutter
I’ve just completed a year long project for a large client helping rewrite their mobile apps in Flutter.
Neither I or the other members of the team had done much/any Flutter development before, so it meant learning best practices together - sometimes through trial and error, finding out what worked for our particular app.
I really enjoyed using Flutter, and it’s definitely the nicest cross-platform development system I’ve used so far.
Good Points
Uses a declarative UI (like SwiftUI) which is a productive, modern way of developing reliable and predictable user interfaces
Hot reload - not needing to recomplie to see every change in the simulator - is very nice when doing UI work
Visual Studio Code is a great and versatile development tool, with lots of handy extensions (I’d strongly recommend using it rather than Android Studio for doing Flutter development)
Less Good Points
Support for packages can be a little patchy
Flutter has support for most common requirements out of the box, or with Google written packages.
However for more specialised needs, several 3rd party packages we used weren’t of great quality, and we had to fix some fairly basic bugs in them. They were mostly packages developed by a single developer, and the owner generally didn’t have the time or inclination to keep them up-to-date or fix every bug found.
As ever with depending on 3rd party packages, use at your own risk
Using Dart was fine, but felt a bit limited compared to using Swift
React Native
I picked up a small React Native project for a new client, who wanted a few updates made to an existing app another agency had developed for them.
I was looking forward to using React Native, as I’d only briefly looked at it before - and to be fair haven’t spent enough using it to make a definitive judgement - but to be honest I was quite disappointed.
The app was using Expo, which offers a slightly clunky hot reload experience.
I also didn’t really enjoy going back to using JavaScript for mobile development, after using more suitable strongly typed and compiled languages.
I’ll hold judgement until I’ve done more RN coding (and it may be that the inherited codebase wasn’t well designed in the first place), but my first commercial experience of it wasn’t anywhere near as nice as developing in Flutter.
Summary
I’d definitely recommend using Flutter for the right projects. Those projects that are mostly cross-platform rich UIs without any complex on-device requirements are a good fit, as you are less likely to hit any issues with pany 3rd party ackages you need.
I can see how React Native might be a good fit for a team that already uses React in a web app, but unless that is you - or your team has strong front-end JavaScript skills already - I can’t see much advantage in using it.
3 years ago I mentioned using Xamarin and Cordova/Ionic, and I definitely wouldn’t recommend starting any new project using them any more.
However, I’ve started a a new project back using Swift/SwiftUI/native iOS development - and am VERY happy doing just that! SwiftUI in particular is a joy to use, and I am much more productive using it - even compared to doing Flutter development with it’s useful hot reload.
Auto-incrementing version numbers in apps using the number of Git revisions
One of the minor pain points for an app developer is managing app version numbers.
How I try to minimise the work needed when updating my apps is to automate this as much as possible, so I thought it would be useful to document how I do this, for my reference as much as yours.
iOS
Reusing the same version number across multiple targets
On iOS, if you have multiple targets in your solution, you need to ensure all the extensions have the same version number.
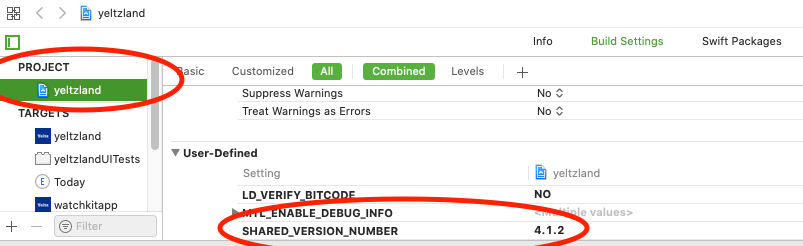
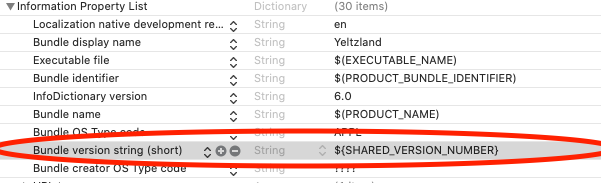
This can be quite a long list of things to keep in sync - for example, my Yeltzland app has 6 targets that need to have an identical version number (the app itself, Today widget, Watch app and extension, Siri intent and Siri intent UI)
I make this easier by having a user defined build property called "SHARED_VERSION_NUMBER" set at the Project level in Xcode.
I then use this variable in the Info.plists for each target as shown below.
Obviously this means I just need to update the version number in one place to automatically update it in all the targets.
Setting the build number
As I said above, I set the build number to be the number of Git revisions in the repo so far.
This guarantees a unique and incrementing build number for releases, and a informative number that helps when communicating with users about what version of the app they are running/testing.
I do this by adding a custom Build Phase to each of my targets that:
Uses git rev-list --all --count to get the current number of git revisions in the repo
Sets the ‘CFBundleVersion’ property in the Info.plist file to this number, using the PlistBuddy utility
I have a Xamarin iOS and Android native app - inherited from another company - so wanted to use a similar strategy for incrementing the build numbers.
This solution isn’t as nice - that can probably be said for Xamarin in general! - but it does work.
It involves manually adding build steps into the iOS and Android project files, that use the now familiar git command to get the build number we need, then using XmlPoke commands to set the values in either the iOS Info.plist or the Android AndroidManifest.xml files.
The pain is it changes the actual files in the repo - not just setting values at build time - so the Info.plist and AndroidManifest.xml files are continually being changed in the repo.
Below are what I added to my two project files for reference …
WatchOS apps can be so much nicer using SwiftUI, but it's still early days for the technology
I’ve been doing Paul Hudson’s excellent 100 Days of SwiftUI course, and decided to take the plunge and rewrite my WatchOS apps using SwiftUI.
Advantages of SwiftUI on WatchOS
I believe SwiftUI started life as a replacement for WatchKit and it really shows. It’s always been hard to build rich interfaces on WatchOS before, and Apple’s built-in apps couldn’t have been using WatchKit as they had many features simply unavailable to non-system developers.
With the power of SwiftUI, it’s now pretty easy to build rich animations, scrolling card views, and generally make first class apps that are much nicer to use.
The one (slight) downside is that you need to be running WatchOS 6.0 and above to run SwiftUI-based apps. However, I think Apple Watch users are pretty likely to be running the latest OS, and for my particular apps, the previous versions were pretty simplistic so didn’t see much usage anyway.
Changing to a SwiftUI mindset
SwiftUI is going to be a great way of developing apps for Apple’s multiple plaforms, although it’s still very new. The documentation leaves A LOT to be desired, and there are still bugs being fixed in each new version of Xcode/iOS.
The most interesting challenge was switching to a more reactive, event-driven way of propogating data changes into the app.
I won’t copy a whole bunch of code here, as both apps are open source and available here and here.
Updating the UI when the app became active
One particular challenge it took a while to figure out was how to trigger the animation of the progress control in Count The Days Left every time the app became visible.
There is an onAppear() function that can be added to a View. However, it turns out that is only run the first time a view appears, so when you reopen the app that is still in-memory, it won’t get called again.
This also meant that if the app stayed in memory overnight, it wouldn’t update the view the next day - which would obviously then be out of date 😟
The solution
In the data model class the the view observes, add a PassthroughSubject object:
import SwiftUI
import Combine

class WatchDaysLeftData: ObservableObject {

    @Published var currentPercentageLeft: String = ""
    @Published var currentTitle: String = ""
    @Published var currentSubTitle: String = ""
    @Published var percentageDone: Double = 0.0

    let modelChanged = PassthroughSubject<(), Never>()
    ...
The observable object also exposes a updateViewData() function, that (amongst other things):
Resets the self.percentageDone to be 0.0, and then calls self.modelChanged.send(())
Calculates the correct self.percentageDone, and then calls self.modelChanged.send(()) again
The View class receives messages from the modelChanged object, and updates the view using an animation:
struct ProgressControl: View {
    @State private var animationProgress: Double = 0.0
    @ObservedObject var model: WatchDaysLeftData

    // Code cut for clarity

    var body: some View {
      ZStack {
        // Code cut for clarity

        Arc(progress: self.animationProgress)
        // Code cut for clarity
          .onReceive(model.modelChanged, perform: { _ in
            withAnimation(.easeInOut(duration: self.duration)) {
              self.animationProgress = self.model.percentageDone
            }
          })
        }
    }
}
Obviously this “animates to 0.0” and then “animates back to the real value” because two separate messages are sent to the View.
Finally, the actual data model passed through into the View is a property on the extension delegate, so we can call self.dataModel.updateViewData() in the extension’s applicationDidBecomeActive() event handler, which triggers a “re-animation” each time the app becomes active.
Did that make sense?
As you can see from the video below, this isn’t ideal, and to be honest feels a bit hacky. It would have been MUCH nicer if the View’s onAppear() worked as the name implies, and runs every time the view actually appears!
It could also be that I’m still learning SwiftUI - so definitely let me know if you have a better solution!
Videos showing what I’ve been trying to say
Here’s the new Count The Days Left, showing the nice animation (with room for improvement!):
… and here’s how my new, improved Yeltzland app looks. The card view is perfect for Watch apps, and was as easy adding .listStyle(CarouselListStyle()) to the List View showing the fixtures and results data.
Please excuse the scroll glitch, as my home-made video setup meant I struggled to turn the digital crown with my wrist at a funny angle 🙄
Summary
I’m really happy how much better my two WatchOS apps are now, and SwiftUI is truly game-changing (not just for the Watch!)
Once I decide to bump the main Count The Days Left app up to support only iOS13 and above, I should be able to reuse most of the SwiftUI code pretty much as is, which will be fantastic.
I’m also considering building Mac Catalyst versions of the apps at some point, so again could consider doing those in SwiftUI. However other issues (around some 3rd party dependencies) don’t make this easy, so that may be a while off yet.
Fingers crossed, but I think I’ve finally fixed an irritating issue in my Yeltzland iOS app, where session cookies were being intermittently dropped in WkWebView.
This was especially painful when using the Yeltz Forum as you’d be logged out of your account every so often 😞.
The problem is (always) threading
I’ve spent ages over the years trying different solutions to see what’s happening, and as far as I can the root cause is that WkWebView actually runs on a different process than the app, which can prevent cookies being synched properly - and hence being dropped if you are unlucky.
The solution
I changed the code to use a single WKProcessPool for all web views in the app, and then instantiate each WkWebView is created using the following code:
lazy var webView: WKWebView = {
    let appDelegate = UIApplication.shared.delegate as! AppDelegate

    // Use a single process pool for all web views
    let webConfiguration = WKWebViewConfiguration()
    webConfiguration.processPool = appDelegate.processPool

    let webView = WKWebView(frame: .zero,
                    configuration: webConfiguration)
    webView.navigationDelegate = self

    return webView
}()
This was based on a very helpful comment by LinhT_24 in the Apple Developer Forums, for which I’ll be eternally grateful.
I’ve been running this code for nearly two weeks now without being logged out from the forum, so I really hope this is fixed.
Hopefully this post might help someone else with the same problems too!