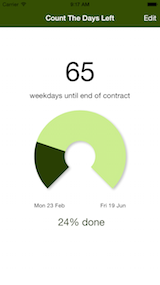
Count The Days Left is a simple, elegant iOS app that does just one thing - counts the days between the start and
end date of an event or project, and how far along you've progressed so far.
It's optimised around your work tasks, as you can decide to count just weekdays if required.
I've also added a nice widget for the Today notification screen, for quick access to your progress, as well as an
Apple Watch app and complication.
The app was written as part of a "develop in the open" project, so if you're
interested in the code it's available on GitHub, or read the blog posts below ...
12 Feb 2017
I recently released a version of my Count the Days Left app which included ads for the first time.
I thought long and hard before doing this, so I thought it might be interesting to document how I worked through this decision, as it’s pretty typical
of the trade-offs independent software developers have to make.
How I make money
I’ve been a commercial software developer for nearly 30 years now (wow!), including over 10 years working at Microsoft (MSN/Bing/Skype).
Right now, I split my time between:
- Contracting out my skills to businesses for fixed-term projects
- Building mobile apps and websites for businesses
- Developing my own iOS and Android apps for both pleasure and profit
In 2017 I’m trying to diversify my business more, so the 3 areas above contribute more equally to the bottom line.
Currently, by far the biggest part of my income is working on contracts for other people,
and I’m trying to generate more independent streams of income so I can be more in control of both my time and where I work.
Why I built Count The Days Left
I built the app for a few reasons, but mainly:
- I wanted to showcase my skills to generate potential business
- I wanted this app for myself, and most of the alternatives in the App Store were either ugly or not quite what I wanted
For the first point, I’ve blogged extensively about how I’ve built the app,
as well as open sourcing the code on GitHub so potential customers can see my work.
The app has been pretty successful in meeting these aims, and has definitely helped in generating business (although it’s hard to measure the actual monetary value of this).
As you’d expect from a simple and niche app, it doesn’t have masses of users - daily users are definitely in the hundreds rather than the thousands.
In fact, some of the features (showing the days left as an icon badge, the Today widget, plus the Watch complication and app) are designed so the users don’t actually need to open the app every day, but I’m pretty proud of how it’s turned out.
Monitising the app
For any iOS app, there are three main ways of making money from an app:
- Charging to buy the app
- Adding an in-app purchase or subscription, probably to unlock additional functionality in an otherwise free app
- Adding ads
Now, unfortunately I suspect there is very little chance I’d sell many copies if I decided to charge for the app.
There are so many free competitors to this particular app, and even if my app is better than them - and obvioiusly I think it is :) - it’s very hard to
see how many customers would agree.
People are now so used to getting high-quality free software, generally from venture capital backed companies who are happy to lose lots of money
to capture large audiences in the hope of monitising that audience later. That makes it a very hard sell to convince people even to spend $0.99 on an app that
might provide them with lots of value.
Personally I’m happy to pay for good software, especially from independent software developers who are doing great work.
However I completely understand why most people
don’t think in that way, and as I can’t see the situation ever changing, for most consumer apps I can’t see there’s much point in even charging a very small amount.
Now this particular app only really does one thing (although hopefully it does it well!), so I can’t see any sensible way of adding “pro features”
to be unlocked by an in-app purchase.
I guess I could try a patronage/shareware model, and ask for money to support the app?
I’m not sure that would actually generate any money without some sort of persistent nagging which I don’t think I’d be happy with.
This probably gets to the nub of my problem with all of this discussion. I’m not sure if it’s a British thing, but the conflict between needing to get paid and
somehow seeming to be only doing it work the money is complicated.
I do want people appreciate and enjoy the app, and somehow this should be separate from the dirty business of getting paid.
So this just leaves adding ads.
Tasteful Ads?
I didn’t want the app’s main screen to show ads at any time. I think its’ main selling point is it’s a tasteful and good-looking app
(especially compared to some of my competitors), and slapping an ad there would completely negate that.
Therefore only other place left to put the ads is on the settings page, where you change the title, start and end dates of what you’re counting down to.
I’m reasonably happy with this compromise, although from a pure money-making point of view this page is not viewed very often, as the users only go thereevery time they start a new countdown.
I’m using Google to provide the ads via AdMob, and have customised them to be text-only and in a color that matches the rest of the app. At least in that way they are not too
jarring, and fit in as well as I can make them.
As you can see from this example, the way the ad looks is OK (even though the content is frankly a bit shit)

Is it worth it?
In the first week, I’ve made a few pennies - slight more than I expected, which was very little be honest!
However, I’m generally happy I’ve done this. I think it’s important all software developers get paid fairly for their work,
so turning the tide against the idea all software should be free - even the the smallest way - is OK.
Probably.
Obviously giving Google even more data is not “free” for my customers, as they are now paying for the app with their information.
I’m not 100% happy doing that, but as I’ve hopefully explained here, it’s a complicated trade-off.
Feel free to contact me via Twitter at @yeltzland if you have any thoughts on any of this.
27 Jan 2017
Version 2.3 of Count The Days Left has now hit the App Store for your viewing pleasure.
I finally got around to upgrading the code to Swift 3. The Xcode migration code did a reasonable job with the syntax changes, but missed a few things around interface changes - especially in the WatchOS code - that
I had to fix manually.
I also fixed a very minor logic error in the date calculation in the settings page. Quite amazing it had been sitting there in plain sight for a long time without me noticing it.
Not much more to do in the app right now, but maybe WWDC in the summer will bring some exciting new areas in which to play in?
02 Oct 2016
Now that iOS10 is out I thought it was about time I built an iMessage app for Count The Days Left.
To be honest, it took very little time once I’d written a script to generate all the “progress images” I needed i.e. 100 images that show the percentage
completed in the progress bar.
The UI is just a standard Storyboard + UIViewController for layout, and then hooking up an event handler to a ‘Send Message’ button (see below for details).
@IBAction func sendMessageTouchUp(sender: AnyObject) {
if let conversation = self.activeConversation {
let now: NSDate = NSDate()
let model: DaysLeftModel = DaysLeftModel()
// Make a new layout object
let layout = MSMessageTemplateLayout()
// Set the caption on the layout
layout.caption = model.FullDescription(now)
// Set the correct image on the layout
let percentageDone: Float = (Float(model.DaysGone(now)) * 100.0) / Float(model.DaysLength)
let intPercentageDone: Int = Int(percentageDone)
let imageName = String(format: "progress%d", intPercentageDone)
layout.image = UIImage(imageLiteral:imageName)
// Make a new message and set its' layout
let message = MSMessage()
message.layout = layout
// Insert the message into the conversation
conversation.insertMessage(message, completionHandler: { (error: NSError?) in
print(error)
})
}
}
Other than the usual fun with making everything look OK with Storyboards and Auto Layout at the different screen sizes, it all
worked out pretty well as you can see from the screenshot below:

I’m not sure how useful this will be, but it was very easy to build and I’m pleased with the result.
12 Aug 2016
It’s summer, which means updating all the Brave Location apps for the new version of iOS.
Thankfully this year the UI changes weren’t too big, and the real work was because of how the Today widgets
are changed in iOS 10.
In iOS 9, the widgets are on a dark background, so it makes sense for the text to be generally white.
Here’s how my stunning well-designed widgets look in the Today section on my iPad running iOS9 …

Now in iOS 10, the widgets are much more accessible - can be accessed directly by right swiping even on the lock screen - but
the design has also fundamentally changed. The background is now a light, semi-transparent color by default, on which obviously the white text of the existing
widget design is basically unreadable.
Now I didn’t want to have an iOS10 only release ready, as all of my apps currently target iOS 9.0 and above
and I want to keep it that way for a while.
So what I do at runtime is detect whether we are iOS 10.0 or above by the following code snippet:
let ios10AndAbove:Bool = NSProcessInfo.processInfo().isOperatingSystemAtLeastVersion( NSOperatingSystemVersion(majorVersion: 10, minorVersion: 0, patchVersion: 0) )
I can then set the background and text colors of the widgets to appropriate for iOS 10 when necessary, buy keep the “traditional”
look and feel on what will soon be legacy versions.
Quite happy with the way it’s turned out, even though I say it myself.

Updates are should all be in the App Store shortly (in case anyone else is running the iOS10 beta), and for everyone else in September I assume!
09 Jun 2016
I’m really happy with the “Show the days left as a counter on the app’s badge” feature on Count The Days Left, but unfortunately due
to the way Apple implements background fetches makes it a little unreliable in staying up to date.
The latest version of the app fixes this by using push notifications to regularly wake the app to update itself.
Background fetch is unreliable
The problem was that I was using the background fetch feature to run the app in the background every so often,
and when it runs update the number of days left on the badge.
However, the frequency the background fetches are run is completely down to the operating system. Now as far as I understand,
iOS will allocate background processing time based on how often the app is used.
Obviously this causes a bit of a logical error. If the user enables the badge to show the number of days left, they are a lot
less likely to open the app - which obviously means it’s less likely to run in the background, so is more likely to be wrong :(
Push notifications solve the problem
The best way of fixing this issue is to send out regular push notifications to the app, so it’s guaranteed to wake up and refresh the badge count.
In an earlier post I wrote about how I’ve found Azure the easiest
way to set up the server side of things, and I did the same here.
I then send out notification with "content_available": 1
in the payload, which will not show anything in the
Notification Center to the user, but the app will wake up in the background and run the code to update the app.
Obviously this means setting up some (minimal) server infrastructure to manage this.
I’ve written a NodeJS script that triggers the push notification via the Azure API,
and setup a cron job to run the script every 6 hours.
So far for me this has worked a treat, and I’m much happier with the solution even though it took a bit more work.
The new version of the app (v2.0.4) is available on the App Store right now.
14 Apr 2016
One slightly strange and irritating issue with Count The Days Left is the app has a small but noticeable delay on startup.
I added a ton of instrumentation to help figure out what was going on, and was then able to make some micro-improvements which have helped a little. However this small decrease in loading time makes the app FEEL a lot quicker on startup.
Changes made:
- Move the Watch communication initialization code off a background queue onto the main thread
- Removed an additional and unnecessary call to update the badge number
- Moved updating of control settings into viewDidAppear() from viewWillAppear()
- Optimised watch app view updating logic to do minimum work necessary
The first point was unexpected, but after measuring the actual speed of the code the overhead of spinning up a new thread and running code in parallel was not actually worth doing. As ever, measurement trumps expected outcomes.
The third point clearly didn’t really any difference to the amount of code to be run, but perception is all and it feels a little faster.
The final point is obvious - the Apple Watch is very underpowered, so doing the absolute minimum amount of work at all times is essential.
Summary
The startup time is still a little slow - and my unproven suspicion is that Swift apps take a little longer to initialise in general anyway - but I’m a lot happier with it now.
As ever, more details can be found on the GitHub repository where all the code for the app lives.
I’ve just submitted v2.0.3 to the App Store for review, so unless we have any shenanigans as before hopefully it will be available in the next few days.
07 Feb 2016
So I finally made some progress after my rant last time
and I’ve finally released the latest version of Count The Days Left
to the App Store.
What I changed
The “problem” was that the watch complication was deemed too similar to the battery complication. This was
because it’s using the CLKComplicationTemplateCircularSmallRingText template
that is one of the few - and pretty restricted - template options available to a developer
Here’s a screenshot from my watch, with the battery complication in the center and the “problem” Count The Days Left one on the right:

I decided to make the most minimal change possible - simply change the style of the progress ring from Closed
to Open
If you look closely, you can see the massive difference this made below:

I think this is actually a better choice, as the very small “open” gap at the bottom of the circle matches the main UI.
Anyway after a worrying delay of 3-4 days while the app was “In Review”, the change was accepted and version 2.0.2 has
FINALLY been released!
Moral of the story is …
Never underestimate how crazy the app approval process can be!
Links
17 Jan 2016
I’ve not been able to release the changes to Count The Days Left mentioned in
my last post because of a very frustrating review from Apple’s App Store reviewers.
Review feedback
After waiting over a week for the new version to be reviewed, I received notification that it had been rejected. I assumed
this was because of the Xcode bug I documented in the last post,
but it was actually the following:
8.3 - Apps that appear confusingly similar to an existing Apple product, interface, or advertising theme will be rejected
8.3 Details: Your Apple Watch app contains features that mimic native iOS interfaces or behaviors.
Specifically, the Complication used for your Apple Watch app mimics that of the native ‘Battery’ Complication design and interface.
Next Steps:
Please revise these features to make them distinctly different from the iOS behaviors and interfaces to avoid causing user confusion.
Illogical
Now although the reasons given for the rejection are factually correct, they really don’t make any sense.
Here’s a screenshot from my watch, with the battery complication in the center and the Count The Days Left on the right:

However there is a very good reason it looks the same - it’s using the CLKComplicationTemplateCircularSmallRingText template
that is one of the few - and pretty restricted - template options available to a developer.
Almost certainly the battery level complication is using the same template, which makes a lot of sense. If you have a “progress” number you want to
show - which both the battery and my app do - this is the logical template to use.
Obviously if using this template in your app isn’t going to make it through an app store review, it doesn’t make any sense to allow
it in the complications SDK.
However the real answer is that using this complication shouldn’t be rejected by the reviewers. I’m obviously not trying to
pretend my app is a battery level complication, and when the user is selecting their complication which one is which (as you can see below):

It’s this level of over restriction of their platform that can make it very, very frustrating developing for Apple’s platforms.
I’m not advocating a free for all on allowed apps, and their needs to be quality control to not allow apps which abuse user’s data or the like.
However even the intent behind this rule doesn’t make any sense. The fact that my app’s complication looks like another one doesn’t harm
the user in any way at all, and if they want to use both at the same time then why shouldn’t they?
Inconsistent
If you’ve been following along as I’ve developed this app, you’ll have spotted the other flaw in Apple’s system.
The complication design hasn’t changed at all since the previous version which was deemed acceptable in previous reviews!
What to do next
I obviously appealed against the review to the App Store, giving the arguments I made above but it still got rejected.
I’m not sure how best to move forward now. I guess my options are:
- Resubmit the app again and hope this time I get a more favourable reviewer
- Change the complication so it looks differently, which will actually make the app less useful to its users
- Remove the complication from the app
- Give up, and just keep the improvements in the latest version for myself
Option 1 would be best, although it means waiting another week for a review with an unknown chance of success (probably low because I’ve already appealed)
Option 2 is what I may be forced to do, although it really pains me to make my app worse just to work around Apple’s incompetence
Option 3 would clearly make the app worse, and I know it’s a key feature for more than one user (including myself!)
Option 4 is where we are right now, and is where we’ll be until I find the energy to do something else :(
As you can probably tell, I’m not very happy on where this has ended up.
Links
30 Dec 2015
I’ve been making some minor updates to Count The Days Left
- Added an optional badge icon so you can see how many days are left without even opening the app
- Made the app universal so it works better on the iPad, improved the layout so it works in both in portrait and landscape modes, and can be used in Split View
Neither of these improvements are particularly interesting, but what I thought I’d write about was a very irritating bug
in either the App Store or Xcode 7.2 (or some combination of the two).
As you can imagine none of the changes are particularly massive, but uploading an archive to iTunes Connect gave some strange errors:
- WatchKit 1.0 - Your previous version used an extension for Apple Watch but your current version doesn’t. Users who haven’t updated their Apple Watch to watchOS 2 or later may lose access to their Apple Watch extension.
- Invalid Icon Name - The watch application ‘daysleft.app/Watch/daysleft WatchKit App.app’ contains an invalid icon file name ‘daysleft.app/Watch/daysleft WatchKit App.app/WatchAppIcon44x44@2x.png’. Make sure that icon file names follow the pattern “*@x.png" and they match the required dimensions. Please visit developer.apple.com/watchkit for more information.
In particular the 2nd error is strange, as I’ve just used the standard Xcode Images.xcassets template to set the images. There
is a 44x44@2x image required which I’ve definitely set to an 88 pixel square image, but it looks like there is a bug setting this
in the archive generation.

I’m definitely not the only person seeing this issues, as there is at least one existing Radar bug
been opened on the same topic. I also opened a Radar (23871724) - it seems opening duplicates is the best way of making sure Apple
know it’s a common problem - which is now closed as a duplicate of yet another one (23859182) - so hopefully this is being
addressed by Apple.
My guess is that this became a problem after I upgraded to Xcode 7.2, but I don’t have the energy to revert back to 7.1 to confirm.
I’m not sure if this will prevent the new version being released, so I’ve submitted it and all being well it’ll be available shortly.
21 Oct 2015
Unfortunately there was a bug in v2.0.0 of Count The Days Left where the watch
complication wasn’t reliably updating itself.
Fortunately the issue was interesting enough to blog about :)
What I believe was the issue - not 100% sure but it appears fixed now - is that a watchOS 2 app only has a limited budget
of time where it’s allowed to update itself.
In the getNextRequestedUpdateDateWithHandler
function in my complication data source class, I was telling the watch
to update once an hour. This seemed a reasonable compromise (without thinking much!) where the watch would update
itself once an hour automatically, even if the options for the countdown didn’t change - which forces a complication refresh.
However I believe that once an hour is too frequent. If you read the Apple Documentation
closely, it says:
At the end of a scheduled update, ClockKit calls the getNextRequestedUpdateDateWithHandler: method to get the time for the next scheduled update. Specify a date as far into the future as you can manage. Do not ask the system to update your complication within minutes. Instead, provide data to last for many hours or for an entire day. If your budget is exhausted, the next scheduled update does not occur until after your budget is replenished.
Now obviously my count only updates once a day, so I can return in getNextRequestedUpdateDateWithHandler
to next update
itself at the start of tomorrow, which means it will only automatically update once a day (but should be correct all that day!)
It appears to have worked on my watch overnight, so I’m sending a v2.0.1 to the app store today (Wed 21 Oct 2015). The last version
made it past review and into the store in about 2 hours(!), but it’s unlikely to be that quick again.
Update (2015-10-29)
Turns out it was more complicated than I thought :)
Even after the fixes above the complications still intermoittently failed to update overnight. I just think the “automatic updating”
is just a bit flaky.
Anyway, I’ve much improved things by putting in an additional call to update watch complication every time the iPhone app,
today widget or watch app is access. I also added a background app refresh handler in the iPhone app to call the same update
method when ever it is intermittently called.
All of these calls shouldn’t be too frequent - so should have a neglible effect on battery life I hope - and guarantee
as much as I can the complication is up to date.
Another version has been submitted to the app store, and hopefully this one will fix the issue.
N.B. All code can be seen on GitHub
17 Oct 2015
All done! A final few tweaks and v2.0.0 of Count The Days Left has been submitted to the app store for review.
Things I learnt
Developing for the watch is fiddly
watchOS 2 is a pretty big change from the first version, with the extension code now running on the watch. In theory this should
help the performance of watch apps - and I believe it does - but some thought needs to be put into to how you manage your
data flow between the phone and the watch to optimise this.
I also struggled for a while understanding the best workflow for testing watch apps, using a combination of the Xcode
simulators and the watch itself, but definitely learnt a lot along the way what works best.
Is Swift ready for prime time?
I really like Swift as a language compare to Objective-C (although now I’m used to the crazy square bracket syntax I don’t mind
the latter any more), but I don’t feel as though Xcode is quite as reliable when building a Swift project compared to an
Objective-C one.
Sometimes the dependency detection on what changed seemed a bit flaky, or the compiler would say a setting is missing from
an Info.plist file when it was actually there (and a recompilation “fixed” the issue).
None of the problems are major, and won’t put me off starting a new project using Swift. However I’m hoping things get
fixed in later versions of both Xcode and Swift.
What next?
Right now I think I’ve reached the end of features I can add to the app, at least until iOS10/watchOS3 come out and offer some
new things to play with.
However I’m always open to suggestions, so drop me a line at johnp@bravelocation.com or
reach out on Twitter to @yeltzland if you have any thoughts.
v2.0 Articles
N.B. All code can be seen on GitHub
15 Oct 2015
So I decided against adding a glance to the app as promised last time, as
it doesn’t really add much value over the app itself, and to be honest I found it quicker to go straight to the app
rather than try to scroll through my glances.
Anyhoo, I’ve had a load of fun trying to get the complications working, and after more to-ing and fro-ing finally have it working.
This should have been easy, especially as the built in templates for the smaller complications already have the “progress ring”
that matches almost exactly what I want.
Apple’s documentation
is OK if a little dry, and there are few helpful examples that can be found with a quick search.
The one key point I found was that the Xcode project settings where you set the data class to be used for the
complications data isn’t quite correct.
What you need to do is set the class in Info.plist to be:
$(PRODUCT_MODULE_NAME).ComplicationsDataSource
not:
ComplicationsDataSource
as the target\General\Complications Configuration would suggest.
So I think v2.0.0 is just about done! I’ll need to generate the App Store screen shots and text as usual, and then hopefully
it’ll be released in the next couple of weeks.
I’ll probably write a summary post soon too to summarise all these ramblings :)
N.B. All code can be seen on GitHub
11 Oct 2015
TL;DR
This is a fairly long story with a lot of false trails, so if you just want the best way of testing on the watch I’d skip to the end
The app never seems to start on the watch
In my last post I mentioned that although the app worked fine in the Watch simulator,
it was “slow” on the watch - in other words it never seemed to load at all.
I first assumed the problem was that the app initialization was taking too long, so I tried a few things including:
- Adding in-memory caching to the data model class to (maybe) improve subsequent reading of user settings post initialization
- Changing the data model to be held in the App/Watch delegate class so it’s only initialized once per app
- Moving the watch session connection code to run on a background thread so it didn’t block the UI thread loading the initial view controller
All of these changes made a difference in the load time on the simulator, but still no joy running on the watch :(
Pushing a TestFlight app to the Watch
I finally realised I must be missing something, so after doing a bit of research I found out that only signed versions
of a Watch app will run on the actual device.
This made a lot of sense, so I followed the further advice of pushing an archived version of the code to the App Store,
and then installing it on my phone (then watch) via a TestFlight install.
Now this actually worked, but it took me ages to actually get an acceptable archive working.
The problem was I was trying to reuse the code in both iOS and watchOS using a code library, and I just couldn’t get the archiving
to work and sign the various bits of code correctly.
This is crazy complicated (for me at least) and to be honest whenever I’ve used a dynamic library other that through pods I’ve
always had issues. Not sure if it’s me or it really is a complicated problem, but it seems the worst part of iOS development
compared to most other languages and platforms.
In the end I gave up with the library approach on the watch, and just added the shared code files to the Watch Extension target
directly which did the trick.
Solution: Add watch to provisoning profiles
Although the “TestFlight” solution worked, clearly it’s non-optimal as there’s a long iteration time
to test any changes on the actual watch.
Some more research found this excellent post
by Jared Sinclair on how to solve this problem by adding you watch to your provisoning profiles.
I won’t repeat Jared’s post here, and it’s sort of “obvious once you think about it” (which clearly I didn’t!), but I guess I did learn a lot
along the various false trails - which is the purpose of the exercise :)
Next Steps
- Add a glance view
- Add watch complications
- Ship it!
N.B. All code can be seen on GitHub
02 Oct 2015
In my last post I mentioned that watchOS 2 doesn’t have access to NSUserSettings
,
which isn’t entirely correct. The watch can have access to user settings, it’s just it can’t directly synchronise
them when they are backed by iCloud.
This means if we change the user settings on the phone we need to push the changes to the watch ourselves.
This isn’t too tricky to do if you follow the instructions on the Apple Developer site
about using WCSession
to set up a sharing session between the phone app and your watch extension.
As I wanted to continue sharing code between the two apps, I’ve had to add a slightly hacky onWatch
property to the
settings class so it:
- Only uses iCloud synchronisation on the phone
- If a setting is changed on the phone, it sets up a
WCSession
and uses it to send a Dictionary
containing the changes via transferUserInfo()
- The watch will receive those changes in
didReceiveUserInfo()
which it can then use to update it’s local settings
There’s a small “code smell” of adding in this onWatch flag just so I can reuse some code in this way, so I may come back
and revisit this code later.
According to the docs
transferUserInfo()
queues any transfers up to send to the watch when a connection is available.
The solution seems to work pretty well - in the watch simulator at least! On the watch itself the app does seem to run rather slow,
but TBH that seems a problem with most watchOS apps I’ve used. More investigation needed!
Next steps: Start tidying up the UI in the existing app, and see if we can improve the performance on the actual watch.
N.B. All code can be seen on GitHub
30 Sep 2015
Updating my Count The Days Left app to watchOS 2 is clearly going to be more work than I thought :(
Upgrading to latest version of Swift
After loading the existing project into Xcode 7, it prompted me to update the Swift code, and when I accepted did a pretty good job
of fixing everything up.
As a learning experience I reverted the changes to fix them up myself. Changes made included:
- Changing the way string length is calculated e.g.
count(self.model.title)
=> self.model.title.characters.count
- Using generic
Dictionary<String, AnyObject>
where previous used NSDictionary
- Updating
NSCalendarUnit
values e.g. NSCalendarUnit.CalendarUnitDay
to NSCalendarUnit.Day
touchesBegan()
event handler now has a Set<UITouch>
parameter instead of a Set<NSObject>
(and a ? on the event)
- Lots of places I’d used
var
could be replaced by let
- too much C# in the day job I suspect :)
Two versions of the shared library required
The big architecture change in watchOS 2 is that the watch extension code runs on the watch not the phone.
This should make the app much quicker, but brings in a whole raft of problems when migrating the code.
First up was making use of the shared library on code used by both the iOS app and the extension.
The version running on the watch needs to be compiled against the watchOS SDK (obviously).
Getting this working stumped me for a while until I found this transition guide
on the Apple developer site. See the Sharing Code Between an iOS App and a watchOS App section on how to make a
duplicate library using the same files but compiling against the correct SDK.
Can’t share NSUserSettings any more
After solving the above problems, everything built and deployed to the simulator/phone/watch OK, but the watch app didn’t actually
work. However a bit more reading of the upgrading code documentation
pointed out a fundamental problem.
Because the extension has moved over to the watch, it doesn’t have access to the NSUserSettings objects, even if we’ve set up the
App Groups capability correctly.
This means I’ll have to roll my own sharing of data between the app and the extension, which is a bit of a pain, but should be fun to learn.
More on how I get on next time!
N.B. All code can be seen on GitHub
29 Sep 2015
So I treated myself of an Apple Watch.
I’m enjoying it so far, but despite being heads down in getting the all-new v3.0 of
Daily Optimiser out the door, and back contracting in London (earning some money!),
I wanted to make some improvements to Count The Days Left now I can actually
see it running on an actual watch.
There are several things in the original version that can be improved on or added to. In no particular order:
- Upgrade to watchOS 2 and latest version of an ever evolving Swift
- Design! A white background? What was I thinking :(
- Adding a glance. It’s now pretty obvious this is the natural place for main access to the app (like the Today widget is the most useful part of the main iOS app)
- Adding a complication so the days left can be seen on the main watch screen
I’m hoping to get all the above done quite quickly, and as before I’ll be blogging here about what I do as well as
sharing the code on GitHub
If you missed it and you’re interested, you can see a summary of the previous iteration
, which includes links to earlier posts.
15 Apr 2015
My first app written in Swift has now shipped and with the Apple Watch update now live too I think we can call it done.
So what did I learn?
Swift - good and bad
The Swift language itself is pretty well designed, and a LOT easier on the eye than Objective-C. The syntax is pretty similar to many modern languages and I think I became reasonably productive quite quickly.
The only downside is that most of the code I wrote was generally just interacting with the iOS frameworks, which aren’t particularly Swift-friendly right now. This means you spend a lot of time dealing with nullable pointers, and with all the slightly mysterious ?s, the code loses some of the readability gains.
Hopefully this will get better over time, any maybe this year’s WWDC will see some progress in making the frameworks a little more Swift-friendly? Let’s hope so.
Summary
I enjoyed using Swift, and almost certainly for any new apps starting from scratch I’ll use it.
However I don’t see there is enough - or any - real advantage in porting any existing Objective-C code so any existing apps that I’m working on I think I’ll keep that way.
Anyway, I learnt a lot and I hope you enjoyed following along!
Previous posts in the series
The code for the project is also available on GitHub
03 Apr 2015
Now Count The Days Left is in the App Store, I thought I should push out the next WatchKit enabled version just in time for anyone who’s getting on on the first day.
Issues shipping a WatchKit app
The release process was pretty smooth - well as smooth as any release to the AppStore is - with a few extra steps needed because of the WatchKit support.
1. You need to add a new Watch icon and screenshots
Surprisingly the icon needs to be 1024px square, but I just reused the image I’d made for the main watch. The screenshots were easy enough to produce in the simulator.

2. No TestFlight support (yet?)
Bit of a pain this one - I suppose this may come later once the watch is out officially? Something to bear in mind if you want to test your app this way and have added WatchKit support.
3. All your version and build numbers must align
Another pain, as I was using a build script to auto-increment the build numbers for the main app - documented here. However there is no “Build Phases” section for the WatchKit App target in Xcode, so I had to remove the script and manually set the build numbers to all match.
There are full details on the Apple developer site on preparing your WatchKit app for release.
Next steps
All done I think, just need to write a summary blog post in a day or so.
Previous posts in the series
The code for the project is also available on GitHub
31 Mar 2015
v1.0.0 is finally in the App Store!
It was the usual wait of about 8 days from submission until release, and I still can’t find it from my phone.
However if you really can’t wait, this link should take you there.
Next steps
I’ve released a new version (v1.0.1) including the WatchKit additions I made, hopefully in time for all those lucky people who are getting new Apple Watches.
There were a few things I had to do to ship the extension, and the steps needed requires a separate post.
Previous posts in the series
The code for the project is also available on GitHub
22 Mar 2015
While v1.0.0 of “Count The Days Left” is waiting for review, I thought I’d have a play with getting a Apple Watch extension written for the app.
Simple is Good
Now as you probably know, the first version of WatchKit is very limited on what you can do in the UI. There are just a few standard controls, no way of writing your own, and any animation can only be done using image sets that are shown one after the other.
However the upside of this is it’s pretty quick to get up and running, and I’ve got something reasonable working after just an hour or so’s work.
Useful Links
Now there are lots of really good starter tutorials out there on getting up and running, so I’m not going to go into too much detail here, but here are a couple of articles I found particularly useful:
The thing that I thought was going to take the most time was generating the collection of images I needed for the animation of the progress circle. Fortunately I found a link to this Radial/Ring/Circle Progress Chart Generator for Apple WatchKit on GitHub which did exactly what I wanted!
Here’s a screenshot from the Watch Simulator with what the app looks like right now:

I haven’t found a way of capturing the animation to show here as the progress circle moves into position, but on the simulator at least it works pretty well.
Next steps
Well I think I’m just about done!
I’ll probably write a summary article wrapping everything up once the app is safely released in the App Store.
Previous posts in the series
The code for the project is also available on GitHub
21 Mar 2015
Version 1.0.0 of “Count The Days Left” is now waiting for review in the app store. Hurrah!
As usual it’s a bit of a slog preparing to ship the app, but it’s finally all done, which means hopefully it’ll be available for the public in a week or so.
App Store Video production
I wanted a preview video in the app store to show off the app’s gratuitous animation. This is now easy to capture as the latest versions of MacOS support having an iOS device as a video source for QuickTime.
However, it turns out QuickTime captures my iPhone 6 at nearly 60 frames per second, but teh App Store videos must be 30fps or less.
Luckily I found a nice utility program called Prism Video File Converter Free in the Mac App Store which did a nice job of the conversion, and I could add a short preview of the app.
I made a feeble attempt at adding a sensible description of what’s a pretty simple app, and now we’re all set to go.
Call for Beta Testers
Even though the app should be available in a few days, if you want to get a preview feel free to mail me and I’ll set you up in TestFlight.
Next steps
- Hopefully a successful app launch
- Start planning support for the Apple Watch using WatchKit
Previous posts in the series
The code for the project is also available on GitHub
14 Mar 2015
We’re getting close to shipping the app I’ve been blogging about, so there’s a few bugs to fix and housekeeping tasks to be done first, to get everything closer to production quality.
Switching back to Xcode 6.2
I couldn’t get the deployment tools working in Xcode 6.3 beta (not surprising I suppose), so I decided to switch the code back to the recently released Xcode 6.2.
This also meant changing the Swift code back to the previous version too which was a bit of a pain, but in reality all this meant was getting rid of the new - but slightly confusing IMHO - casting commands of as?
and as!
The only other change was replacing the much improved count(string)
function to get the length of a string with the rubbish countElements(string)
. Surely an extension method on the String class to get the length should be in the language (or have I missed something?)
You can see from the commit on GitHub the changes I made.
Integrating Fabric
I’ve also integrated Twitter’s Fabric framework for tracking bugs. They had a slightly strange installation program that’s somehow watched Xcode for builds, which doesn’t seem particularly reliable, but I think it’s now all set up correctly. Hopefully this relatively simple app won’t have any crashes, but good to know I should be able to diagnose them if it does.
Bug fixes
I’ve been using the app over the last week or so, and have made a few more improvements:
- Added a timer that fires at midnight each night and refreshes the view, just in case the app is running overnight and needs updating
- Picked a new color palette from paletton.com to tweak the color scheme
- Improved the layout of the main screen so it works better on larger screens - basically set the main control to have a fixed margin from the edge, and have a 1:1 aspect ratio rather than a fixed width and height. This means it scales better on larger screens as well as all the standard phone screen sizes.
- Added a shadow on the main control to get away from a totally flat view. Makes a surprising difference in improving the UI
Screenshots
I used the excellent LaunchKit to take the screen shots I’d take from the emulator and automatically produce the different sizes needed for the App Store. Will definitely use them again as it was efficient and quick.
Here’s what the main screen now looks like on my phone:

Next steps
- Final App Store preparations - basically the copy for the app description needs writing
- Test the beta version via TestFlight - let me know if you want an invite
- Start planning support for the Apple Watch using WatchKit
Previous posts in the series
The code for the project is also available on GitHub
09 Mar 2015
Been slower going now I’m in a contract again - need to get paid!
However I’ve finally got around to fixing the algorithm I was using to calculate the number of weekdays between two dates.
I knew the original one I’d found via a web search was wrong, as I could see the results were wrong when calculating how many days left in my contract. I wrote a failing unit test to capture the issue, and then set about using my brain instead of taking other people’s code for granted.
The algorithm
As ever the code is the most succinct way of describing the solution, but as a basic outline the steps are these:
- Adjust the start and end datetimes to be the start of the day
- If the start date is a Saturday or Sunday, move it forward to the next Monday (SAdj)
- If the end date is a Saturday or Sunday, move it back to the previous Friday (EAdj)
- Calculate the days between the adjusted start and end dates (EAdj - SAdj).Days = AdjTotalDays
- Calculate the full weeks between the adjusted start and end dates (AdjTotalDays / 7) = AdjWeeks
- The tricky bit - Get the day of week (using Apple’s numbering of 1 == Sunday…7 == Saturday) for EAdjDayOfWeek and SAdjDayOfWeek
- Calculate EAdjDayOfWeek - SAdjDayOfWeek = DaysDifference
- If DaysDifference < 0, then DaysDifference += 5 (this is to adjust how the week wraps around the weekend)
- Finally, return (AdjWeeks * 5) + DaysDifference
I think this is correct, and all my unit tests show the model now behaves as I expected, so I think we’re all good!
Next steps
I’m ready to let people start beta-testing the app, but because I’m using a beta version of Xcode I can’t use TestFlight and the iTunes Store.
However this might be a good time to check out Twitter’s dev support including Crashlytics and their Beta distribution support.
Previous posts in the series
The code for the project is also available on GitHub
01 Mar 2015
More progress of sorts, and getting close to having a beta release ready for testing.
Animation in Swift
I wanted the progress to dynamically slide in when the progress bar was shown, and this was done pretty easily using a standard CABasicAnimation on the “strokeEnd” of drawing the line. The code needed to be refactored a little to use layers instead of straight drawing of the line, but again nothing really of interest to show (so looking at the code is clearest if you’re interested)
I tried adding Facebook’s lovely Pop Animation framework, but this was very problematic as it’s an Objective-C library. I nearly got it working before giving up, but will definitely post more on this subject when I try again later.
Other bits and pieces
I also added a swipe left gesture to go from the main screen to the settings, made a simple logo and also added the percentage done to the today widget - I’ve been using the app this week as I’ve started a new contract which has been helpful to improve the interactions.
Next steps
Unfortunately it looks like there is a bug in the “weekdays only” calculations. I have a unit test to prove it, so need to fix this before I’m happy to send out for testing.
Previous posts in the series
The code for the project is also available on GitHub
22 Feb 2015
Lots more tweaks of the UI, in particular making a better Settings page.

It’s a pretty straightforward static table view, but there were a few things I learnt/remembered along the way that are worth sharing here.
Selectors in Swift
Installing the app on my iPad exposed a bug I’d introduced in a selector - just shows you can’t always believe everything you read on StackOverflow!
Setting up the handler for incoming notifications, you need to add a colon to the end of the method name in the selector e.g.
NSNotificationCenter.defaultCenter().addObserver(self, selector: "updateKVStoreItems:", name: NSUbiquitousKeyValueStoreDidChangeExternallyNotification, object: store)
Also on the function being selected, you need to annotate the function with @objc
so it can correctly interact with the Objective-C library code calling it
Custom data entry for text
I wanted a simple way of entering dates, as I stated in an earlier post simply adding a DatePicker to the page is pretty ugly and takes up a lot of screen.
The solution is to show the dates in a textbox, but then setting the inputView of the text box to be a DatePicker.
// Setup the date pickers as editors for text fields
self.textStart.inputView = self.startDatePicker

Obviously you have to take care in calling self.view.endEditing(true)
as appropriate when other elements are selected, but it’s a neat solution that works well.
Setting the build version automatically
I can’t remember where I found this originally, but I’ve used it in projects before. Basically I want to set the build number automatically based on the Github revision number, so I can call it in the code.
The trick is to add this script as part of the “Run Script” you can set in a target’s Build Phases
git=`sh /etc/profile; which git`
appBuild=`$git rev-list --all |wc -l`
/usr/libexec/PlistBuddy -c "Set :CFBundleVersion $appBuild" "${TARGET_BUILD_DIR}/${INFOPLIST_PATH}"
echo "Updated ${TARGET_BUILD_DIR}/${INFOPLIST_PATH}"
You can then use this to add a version number to your display:
// Add version number
let infoDictionary = NSBundle.mainBundle();
let version = infoDictionary.objectForInfoDictionaryKey("CFBundleShortVersionString") as! String;
let build = infoDictionary.objectForInfoDictionaryKey("CFBundleVersion") as! String;
self.labelVersion.text = String(format: "v%@.%@", version, build);
Having a version number in the settings can be invaluable when trying to debug customer issues.
Next steps
Add some quality and animations to the counter control
Previous posts in the series
The code for the project is also available on GitHub
19 Feb 2015
I wanted a nice graphical way of showing the progress of the days counted, so I had to make a custom control.
Luckily a couple of days ago I found a great article on how to do almost exactly what I needed.
After a few tweaks from the article code to expose some hard-coded values as properties, it didn’t take long to get something up and running. I’m not going to repeat the article details here, as it’s very clear.
The easiest way of sharing code between the main app and the today widget is to put the shared code in a separate library, which can then be linked to by both targets.
The main view of the app is now much better looking…

I also wanted to add the control to the today widget, which looks a lot better now too …

Next steps
Improve the UI of the settings view, and overall navigation between the views
Previous posts in the series
The code for the project is also available on GitHub
18 Feb 2015
Now we have the data model code ready, we can start building out the UI for the app.
Basic UI
Working in storyboards, there is obviously very little difference doing this with Swift ViewController code rather than
Objective-C, especially with such a simple UI.

As you can hopefully see from the screenshot of the storyboard, there are just 2 views in the app - one to show the number of days left, and a settings view where we can edit the values in the data model.
Later on we’ll come back to this to make the views look a bit more polished, but I just wanted get the app up and running first before tackling some more slightly interesting problems.
A few things learnt
There’s not a lot to say about the Swift code here as it’s pretty simple. However there were a few things that puzzled me a little during development that I thought I’d capture here.
I didn’t know the DatePicker control has a fixed height, which made it very confusing at first as my initial attempts as restricting the height using AutoLayout constraints just didn’t work. There are ways you can change this using frame size manipulation but I wasn’t happy with doing that in my first pass. I’ll revisit the layout of the settings page later.
Also I’d forgotten how to handle hiding the keyboard when the focus goes off a text field (or when the user presses return on the keyboard). As I’m sure you know the secret is to fire a self.view.endEditing(true)
in a touchesBegan
event handler, and also implement the UITextFieldDelegate and add the endEditing call to a func textFieldShouldReturn(textField: UITextField) -> Bool
method as well
Next steps
Add a widget to Today notification screen, which will involve a little refactoring of the code to make common elements shareable
Previous posts in the series
The code for the project is also available on GitHub
18 Feb 2015
Making a widget to show on the Today notification screen is pretty straightforward, and as I’d done it before
it was pretty quick to do this.
However there are a few steps that must be done correctly for this to work, so it’s probably useful for me to document them here so I remember quicker next time.
Putting shared code in an embedded library
The easiest way of sharing code between the main app and the today widget is to put the shared code in a separate library, which can then be linked to by both targets.
Adding a new target to your project via the “Editor->Add Target…” is the simplest way, and you need to select an “iOS/Framework & Library/Cocoa Touch Framework” template. I tried choosing the static library type, but that only offered me an Objective-C project type which didn’t seem correct even though the data code I’m sharing uses the Foundation code and is non-UI.
After adding the new target, it’s then easy to move the existing files - for me the data model code that’ll be shared in both the app and the widget - into the new target by making sure the files are references in the “Compile Sources” section on the “Build Phases” tab of the target properties (and obviously removing from the original target)
Finally, you’ll need to check the “Link Binary with Libraries” sections for all the targets reference the new library as appropriate, and then the Swift code has the appropriate import daysleftlibrary
code to reference the library code
Setting the app group for the user settings
To allow two different targets access to the same user settings, they need to reference the same App Group where the preferences are hold.

Once that’s done, you also need to reference the group name as the suiteName parameter in the constructor of your NSDefaults object
By default, the title of the widget in the Today screen will take the target name, which for me was the ugly “dayslefttoday”. To be able to override this you can set the “Bundle display name” target property to the required string

You can see the results of this stunning widget below:

Next steps
Undecided yet whether to have a play with the WatchKit, or with some animations in the main app. Stay tuned :)
Previous posts in the series
The code for the project is also available on GitHub
16 Feb 2015
Next stage of the app is to store the settings we previously added to both the local
user settings and to iCloud for syncing across multiple devices.
Luckily I had some Objective-C code I could repurpose for most of the logic, but porting it was a useful exercise in getting used to the slightly obtuse casting syntax necessary in Swift when interacting with the frameworks.
Setting up iCloud preferences
To enable storing key-value pairs for the app in iCloud, it’s as simple as going to the Capabilities section of your project
settings, and:
- Turn on the iCloud capabilities
- Make sure the “Key-value storage” checkbox is selected

Code to get and set preferences
The code - available on GitHub for viewing - is reasonably straightforward port of some common code I’ve used before.
I’ve refactored the main settings code into a BLUserSettings.swift class I should be able to reuse in other projects. The existing DaysLeftModel class now inherits from this base class, and the getters and setters have been changed to call the appropriate read/write methods in the base class.
The getters will read from the local user settings, so they’ll be available even if the device is offline. The setters will write to both the local store, and the cloud store, and the base class also handles notifications if the settings have been changed on a remote device, and writes them locally as appropriate.
Having a bunch of unit tests as always helped to test my refactoring of the model class worked fine.
Next steps
I think we’re now ready to start on the UI.
Previous posts in the series
The code for the project is also available on GitHub
11 Feb 2015
As per my previous posts, I’m developing an iOS app “in the open” using Swift as a learning experiment. It’s going to be an app that counts down the days to a future date.
Data Model design
I thought a good way of getting started would be to work on the data model code. There would be more pure Swift code to write to get up to speed on the syntax, plus I’d get the chance to write some unit tests too.
The data model design is pretty straightforward; I want to have the following properties to hold the settings data:
- start: NSDate
- end: NSDate
- title: String
- weekdaysOnly: Bool
Then there are three different access properties/methods to calculate various day lengths:
- DaysLength: Int - the number of inclusive days between the start and the end
- DaysGone(currentDate: NSDate) -> Int - the number of days from the start to the current date
- DaysLeft(currentDate: NSDate) -> Int - the number of days to the end to the current date
Swift strangeness
Writing a simple class to implement this logic was pretty simple even in a new language, although a few things were a little strange at first in Swift.
Semi-colons at the end of the line are optional in Swift, and a few references I found seemed to say best practice is not to add them, although muscle memory from Objective-C and C# made this hard to do.
Also integrating into the IOS Foundation classes was a little strange in places especially the use of optional values. For example, note the ! at the end of this line
model.start = NSCalendar.autoupdatingCurrentCalendar().dateFromComponents(startComponents)!
My model.start
is of type NSDate
i.e. can’t be null, whereas dateFromComponents()
can return a null value,
so the !
forces this to actually return a value (I think!). Not the most intuitive, but thankfully the Xcode editor prompted me to add the exclamation point.
The other problem I had initially was being able to reference the DaysLeftModel class from my unit test code. I couldn’t figure out anyway of importing the model code, before this very helpful blog post by Andrew Bancroft pointed out the way of configuring the build settings to automatically create a module.
Date calculations
For the date logic of calculating the difference between two dates ignoring weekends was a little tricky, but as usual the Internet was my friend and with the help of TDD and the algorithm outlined in this article by Alec Pojidaev I managed to get it working correctly.
The code
So I’m happy to be up and running in Swift, and the code is up at GitHub if you’re interested.
Next steps
I think I’ll next tackle storing these settings in a local datastore, as well as synching them with the cloud to share across devices.
Previous posts in the series
The code for the project is also available on GitHub
04 Feb 2015
I’m currently in-between contracts, so as promised last week I’m going to try developing a new app in Swift "in the open" and see how we get on.
My idea is to write a simple app that basically counts down how many days left until a certain date. This was inspired by the fact that in my last contract I used a spreadsheet to count down how much I had left to go (it wasn’t that bad really!)
I wanted something simple enough that could be completed in a few days - even though I know very little Swift before starting - and could be extended into an Apple Watch app.
Now there are hundreds of similar apps out there in the app store already, so this isn’t going to be groundbreaking in any way, but hopefully when it’s done it’ll find a small audience.
One-Page Plan
Before starting coding, obviously I want to do a little planning.
I’m very much a believer in doing just enough planning to get started along the right path, and if I had a test team enough information for them to understand what the app should do (but no more).
I’ve finally broken into my Evernote Moleskin notebook to sketch out a mini-design for the main app, and used the Evernote Scannable app to snap a picture:

Beautiful or what?
More usefully, I’m tracking the actual tasks in a Trello board which you should be able to see if you’re interested.
The initial tasks on the backlog - in probable order of development - are:
- Code to handle settings in iCloud
- Settings view to handle input etc.
- Simple main page to show days left
- Unit tests for calculations
- Daily notifications
- Today screen widget
- Watch extension
- Main page animations
Next steps
Start coding!