Basic UI in Swift
18 Feb 2015
Now we have the data model code ready, we can start building out the UI for the app.
Basic UI
Working in storyboards, there is obviously very little difference doing this with Swift ViewController code rather than Objective-C, especially with such a simple UI.

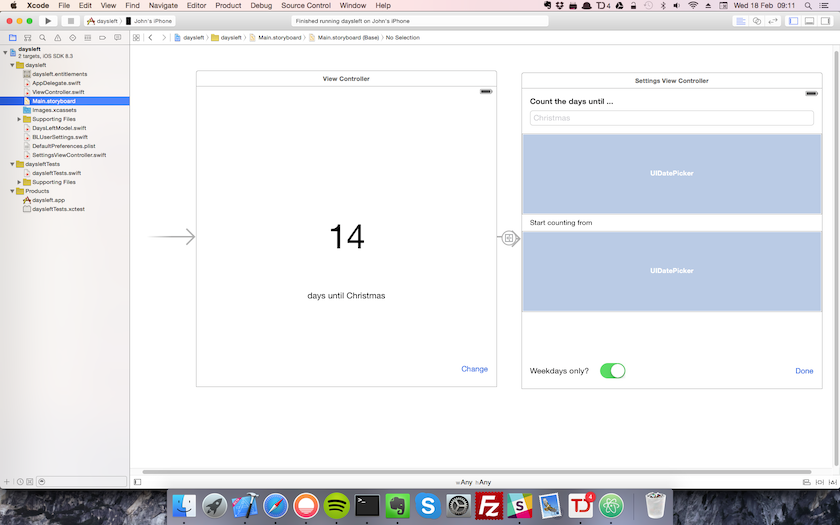
As you can hopefully see from the screenshot of the storyboard, there are just 2 views in the app - one to show the number of days left, and a settings view where we can edit the values in the data model.
Later on we’ll come back to this to make the views look a bit more polished, but I just wanted get the app up and running first before tackling some more slightly interesting problems.
A few things learnt
There’s not a lot to say about the Swift code here as it’s pretty simple. However there were a few things that puzzled me a little during development that I thought I’d capture here.
I didn’t know the DatePicker control has a fixed height, which made it very confusing at first as my initial attempts as restricting the height using AutoLayout constraints just didn’t work. There are ways you can change this using frame size manipulation but I wasn’t happy with doing that in my first pass. I’ll revisit the layout of the settings page later.
Also I’d forgotten how to handle hiding the keyboard when the focus goes off a text field (or when the user presses return on the keyboard). As I’m sure you know the secret is to fire a self.view.endEditing(true) in a touchesBegan event handler, and also implement the UITextFieldDelegate and add the endEditing call to a func textFieldShouldReturn(textField: UITextField) -> Bool method as well
Next steps
Add a widget to Today notification screen, which will involve a little refactoring of the code to make common elements shareable
Previous posts in the series
The code for the project is also available on GitHub
